


Part II: Continuous Integration (CI)
This post it's a continuation of Part One: A walk-through of deploying your GatsbyJS Website on AWS S3 using Gitlab CI/CD for deployment.
In this post, I will cover how to automate the deployment process of Gatsby Website to AWS S3 bucket using Gitlab CI.
For this starter, it's assumed that you have basic knowledge of Git, Gitlab CI/CD, and AWS.
Deploying your website
Alright, now that your S3 Bucket it's ready to host your Gatsby website, you need to think about the deployment process. You can do it manually or you can automate your build process to deploy automatically your website onto AWS S3, using Gitlab CI.
Gitlab CI
GitLab CI/CD is a tool built into GitLab for software development through continuous methodologies:
- Continuous Integration (CI)
- Continuous Delivery (CD)
- Continuous Deployment (CD)
Continuous Integration works by pushing small code chunks to your application’s codebase hosted in a Git repository, and, to every push, it will trigger a pipeline of scripts to run, build, test, and validate the code changes before merging them into the main branch.
We will use this methodology to deploy your website onto your S3 Bucket.
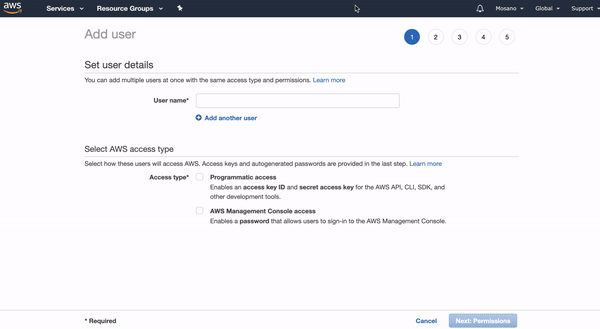
1. AWS IAM User Setup
However, before that, you will need to create an AWS IAM profile in order to Gitlab CI runner to be able to upload all the assets onto your S3 bucket. The steps to create your IAM user in AWS Console are as follows:
- Go to the AWS Console.
- Search for IAM.
- On the IAM Dashboard click on "Users".
- On top of the page press "Add User".
- Chose a name for the profile, in this example, we use "Git-mys3domain".
- Select "Programmatic access" in Access Type.
- Press "Next: Permissions".
- Select tab "Attach existing policies directly".
- Click in "Create Policy", this will open a new window.
- On the new window, select tab "JSON", and then add the following (note that you might need to update it to match your bucket's name):
{
    "Version": "2012-10-17",
    "Statement": [
        {
            "Sid": "VisualEditor0",
            "Effect": "Allow",
            "Action": [
                "s3:PutAccountPublicAccessBlock",
                "s3:GetAccountPublicAccessBlock",
                "s3:ListAllMyBuckets",
                "s3:HeadBucket"
            ],
            "Resource": "*"
        },
        {
            "Sid": "VisualEditor1",
            "Effect": "Allow",
            "Action": "s3:*",
            "Resource": [
                "arn:aws:s3:::mys3domain.com/*",
                "arn:aws:s3:::mys3domain.com"
            ]
        }
    ]
}- Now click on "Review Policy".
- Give a name for the policy, in this example we chose "mys3domain", and add a description if you want to.
- Click "Create Policy".
- Now go back to the previous window, and search for the newly created policy. If it doesn't show up just refresh the web page, and then select that policy, by clicking on the checkbox.
- Then click "Next: Tags", we will skip this step since it's optional.
- Click "Review.
- Click "Create User".
- After that, you will get a "Success" page, and on that page, you will be given the IAM credentials, The Access Key ID, and a secret access key. Store them safely. They will be needed to configure Gitlab CI/CD.
2. Gitlab CI/CD Setup
With your IAM profile set up, its time to configure your Gitlab CI/CD. For this, you will have to go to your website's repository, and on the left panel, look for the options "Settings", click in it, and then on the same panel it will be shown other options beneath "Settings", select "CI/CD".
On the CI/CD Settings dashboard, you should look for the "Variables" section, and click on the "Expand" button right next to it.
Now it is time to create the variables for the AWS credentials that you created on the previous step.
The steps to create your variables are simple, you just need to click on "Add Variable" button that will open the following modal:
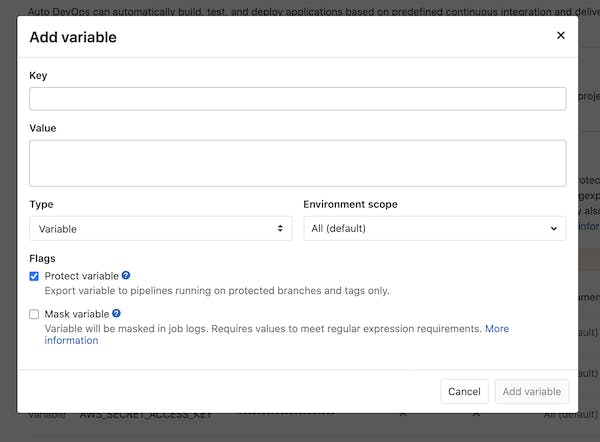
Now you need to fill the Key name as "AWS_ACCESS_KEY_ID" and copy/paste the content from the AWS IAM Profile onto the Value, and click "Add Value". Repeat the process for the "AWS_SECRET_ACCESS_KEY".
Perfect, now you have all the CI/CD infrastructure need for the automated deployment.
3. Add your CI/CD Script to Gatsby
Last, but not the least, you will need to create the CI/CD script that will trigger the Gitlab CI to deploy your website onto S3.
For that, you will need to add the CI/CD script at the root of your project with the following name ".gitlab-ci.yml".
In this file you should add the following (don't forget to adjust the bucket name):
stages:
  - build
  - deploy

variables:
  BUCKET_NAME_PRODUCTION: mys3domain.com

build-assets:
  image: "node:10.16.3"
  stage: build
  cache:
    paths:
      - node_modules/
      - .yarn/
  before_script:
    - apt-get install git
  script:
    - yarn install --non-interactive --cache-folder .yarn
    - yarn build
  artifacts:
    paths:
      - public
  only:
    - main

deploy-s3:
  image: "python:latest"
  stage: deploy
  dependencies:
    - build-assets
  before_script:
    - pip install awscli
  script:
    - aws s3 sync public s3://${BUCKET_NAME_PRODUCTION}/ --delete
    - aws cloudfront create-invalidation --distribution-id E5JESDDYE4WTE --paths '/*'
  environment:
    name: ${CI_COMMIT_REF_SLUG}
    url: http://${BUCKET_NAME_PRODUCTION}.s3.eu-west-3.amazonaws.com
  only:
    - main
This script will trigger the CI build every time that you push your code into your "main" branch. You can trigger the CI with different branch names, you just need to change the name from "main" to whatever you call your branch.
And that's it, now you can use continuous deployment methodology to deploy your Gatsby website.
In my next post, I will explain how to add CDN to your website and SSL as well, using Cloudflare, stay tuned for more!
Please share your thoughts or follow me on Linkedin.

